Battery switch on travel trailer function is crucial for safe and efficient power management. Understanding how your battery switch works is key to avoiding dead batteries, electrical issues, and even potential fire hazards. This guide will walk you through the different types of switches, proper installation, safe connection and disconnection procedures, troubleshooting common problems, and essential maintenance tips. Let’s get started!
From single switches to more complex dual or rotary systems, we’ll cover the wiring diagrams, power flow, and how each switch type impacts your RV’s overall power management. We’ll also address safety precautions, like proper ventilation when working with batteries, and the importance of following manufacturer instructions to ensure a long and trouble-free life for your system.
Understanding Battery Switch Functionality in Travel Trailers

A battery switch is a crucial component in a travel trailer’s electrical system, allowing you to control the flow of power from your trailer batteries to various appliances and systems. Understanding its function and proper usage is essential for maintaining your trailer’s power and preventing potential issues.
Battery Switch Purposes
The primary purpose of a battery switch is to isolate your house batteries from the rest of the electrical system. This prevents unwanted battery drain when your trailer is not in use and protects your batteries from damage. It also allows you to select which battery bank (if you have multiple) provides power to your trailer. Furthermore, a properly functioning switch helps to maximize battery life and prevent premature failure.
Types of Battery Switches
Several types of battery switches exist, each with its own advantages and disadvantages. Single battery switches are the simplest, controlling only one battery bank. Dual battery switches manage two banks, typically a house battery bank and a starting battery for your tow vehicle. Rotary switches are a common type, offering multiple positions for various power configurations. Some more advanced systems incorporate digital switches offering more control and monitoring capabilities.
Typical Wiring Diagram for a Battery Switch System
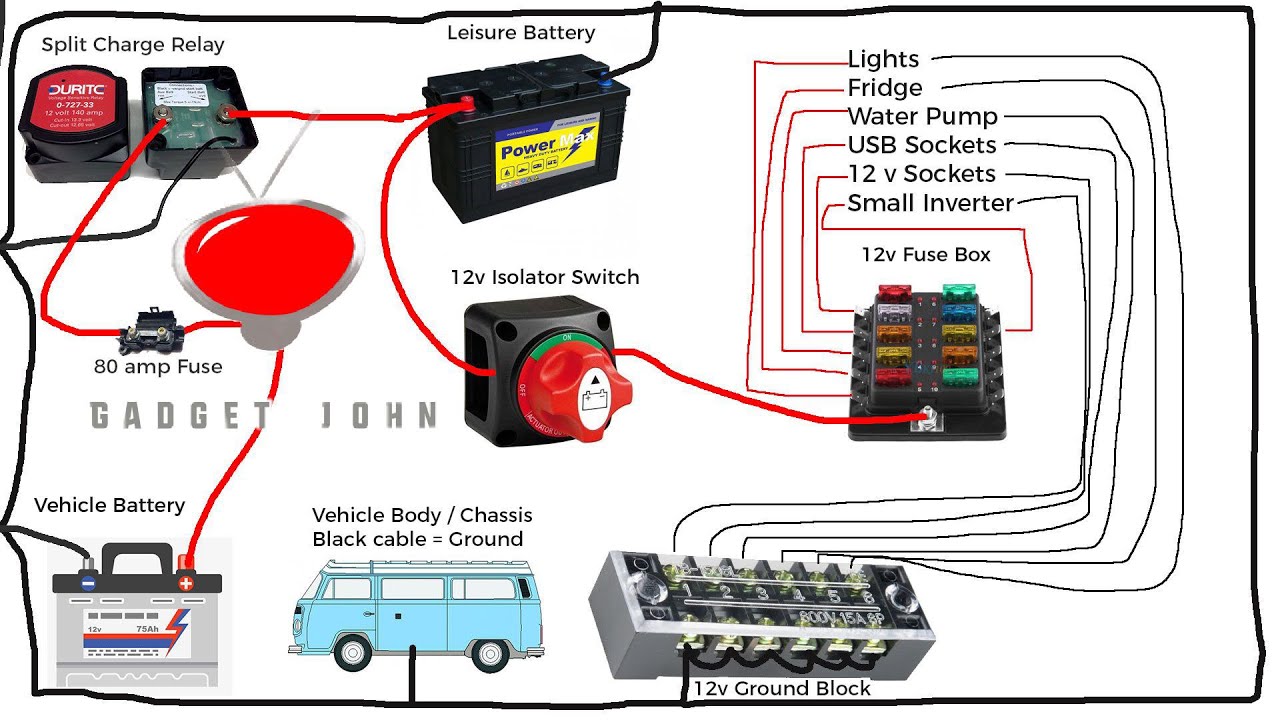
A basic dual battery system with a rotary switch usually involves the following connections: The positive (+) terminals of both house and starting batteries are connected to the input terminals of the switch. The output terminal of the switch then connects to the positive bus bar supplying power to the trailer’s electrical system. Negative (-) terminals of both batteries are typically connected directly to the chassis ground, forming a complete circuit.
A more complex setup might include a charge relay to prioritize charging of the house batteries, ensuring they are fully charged when the trailer is connected to shore power or the tow vehicle’s alternator. Remember to always consult the specific wiring diagram provided with your chosen switch and battery system.
Installing a Battery Switch
Installing a battery switch is a relatively straightforward process but requires some basic electrical knowledge. Always disconnect the negative (-) terminal from your batteries before beginning any work.
Planning a trip? Awesome! First things first: get yourself sorted with travel insurance. Check out Aon travel insurance for solid coverage. Then, think about your in-flight entertainment. If you’re an audiophile, you’ll want to check out audiophile travel setup guides to ensure your listening experience is top-notch, even 30,000 feet in the air.
Having both sorted will make your journey smoother and more enjoyable.
- Choose the correct location: Select a location easily accessible but protected from the elements. Consider a spot near your batteries for easy access to connections.
- Mount the switch: Securely mount the switch to a suitable surface using appropriate fasteners.
- Connect the positive cables: Connect the positive (+) cables from your batteries to the corresponding input terminals on the switch. Use appropriately sized and rated wiring for your system’s current draw. Ensure all connections are clean and tight.
- Connect the output cable: Connect the output cable from the switch to the positive bus bar of your trailer’s electrical system. Again, ensure the correct wire gauge and secure connections.
- Connect the negative cables: Connect the negative (-) cables from each battery directly to the chassis ground. This completes the circuit.
- Test the system: After installation, carefully test the system to ensure the switch functions correctly and that power is routed appropriately to your trailer’s systems.
Always consult a qualified electrician if you are unsure about any aspect of this process. Incorrect wiring can lead to damage to your equipment or even create a fire hazard.
Connecting and Disconnecting Batteries
Connecting and disconnecting your travel trailer’s batteries requires careful attention to safety and proper procedure. Improper handling can lead to sparks, corrosion, and even injury. This section Artikels the steps for safely managing your battery system.
The process for connecting and disconnecting your house battery from the chassis battery involves using your battery switch. This switch allows you to isolate the batteries for maintenance or to prevent draining one battery from the other. Always remember to consult your specific RV’s manual for detailed diagrams and instructions, as setups can vary.
Battery Safety Precautions
Working with lead-acid batteries necessitates a safety-first approach. Lead-acid batteries produce hydrogen gas, which is highly flammable and explosive. Ignoring safety precautions can result in serious injury or damage to your RV.
Before beginning any work, ensure adequate ventilation. Open windows and doors to allow fresh air to circulate, preventing the buildup of potentially explosive hydrogen gas. Always wear appropriate eye protection (safety glasses) to shield your eyes from potential splashes of battery acid. Rubber gloves are also recommended to protect your hands from corrosive battery acid.
Using the Battery Switch to Isolate Batteries
The battery switch is typically a multi-position switch, often with positions like “Both,” “House,” “Off,” and “Chassis.” The “Both” position connects both the house and chassis batteries. “House” connects only the house battery. “Chassis” connects only the chassis battery. “Off” disconnects both.
Planning a trip? Awesome! First things first: get yourself sorted with travel insurance. Check out Aon travel insurance for comprehensive coverage. Then, think about your in-flight entertainment. If you’re an audiophile, setting up your audiophile travel setup beforehand is key for a truly blissful journey.
Don’t forget noise-cancelling headphones for maximum enjoyment!
To disconnect the house battery, move the switch to the “Off” position. This completely isolates the house battery from the chassis battery and any other electrical systems. To disconnect the chassis battery while keeping the house battery active, switch to the “House” position. To reconnect, simply select the desired position (“Both,” “House,” or “Chassis”). Always double-check the switch position before proceeding with any work.
Safe Battery Connection and Disconnection Checklist
This checklist summarizes the key steps for safely connecting and disconnecting your RV batteries. Following these steps will minimize risks and ensure a smooth process.
- Ensure adequate ventilation.
- Wear safety glasses and rubber gloves.
- Identify the battery switch and understand its positions.
- Turn off all relevant electrical devices before disconnecting.
- Carefully move the battery switch to the desired position (“Off,” “House,” or “Chassis”).
- After working on the batteries, double-check the switch position.
- Inspect battery terminals for corrosion and clean if necessary.
- Reconnect the batteries only after completing all maintenance or repairs.
Troubleshooting Common Battery Switch Issues
Your travel trailer’s battery switch is a crucial component, ensuring you can seamlessly switch between your trailer’s batteries and your tow vehicle’s charging system. Problems with this switch can leave you stranded with dead batteries, so understanding how to troubleshoot them is essential. This section will guide you through identifying, diagnosing, and resolving common issues.
Identifying Common Battery Switch Problems
Several issues can arise with your battery switch, often stemming from simple problems easily resolved with a bit of maintenance. Corrosion buildup on terminals is a frequent culprit, impeding the flow of electricity. Loose connections, whether at the switch itself or the battery terminals, can also lead to poor performance or complete failure. Finally, the switch itself may malfunction due to wear and tear or internal damage.
Visual inspection is the first step in identifying these issues.
Diagnosing a Malfunctioning Battery Switch
Diagnosing a problem involves a systematic approach. First, check the battery switch itself for any obvious signs of damage, such as cracks or burns. Then, inspect the connections at both the switch and the batteries for corrosion or looseness. Use a multimeter to test voltage at each point in the circuit. If the voltage drops significantly at any point, it indicates a problem in that section of the circuit.
Remember to always disconnect the negative battery terminal before performing any electrical checks. If the switch is visibly damaged or the voltage readings are inconsistent, it’s likely the switch is faulty.
Troubleshooting and Resolving Common Battery Switch Problems
Once you’ve identified the problem, addressing it is relatively straightforward. Corrosion can be cleaned using a wire brush and baking soda paste, followed by a thorough rinsing and application of dielectric grease to prevent future corrosion. Loose connections can be tightened, ensuring a secure fit. If the switch itself is faulty, it will need to be replaced.
This usually involves disconnecting the wires, removing the old switch, and installing the new one, ensuring proper wire connections. Always refer to your trailer’s wiring diagram and your battery switch’s instructions for specifics.
Common Battery Switch Problems, Causes, and Solutions
| Problem | Cause | Solution | Additional Notes |
|---|---|---|---|
| No power to trailer appliances | Corrosion on battery terminals or switch connections | Clean terminals and connections with wire brush and baking soda paste. Apply dielectric grease. | Check all connections for tightness. |
| Intermittent power to trailer appliances | Loose connections at battery terminals or switch | Tighten all connections. | Use a wrench to ensure secure tightening. |
| Complete power failure | Faulty battery switch | Replace the battery switch. | Refer to your trailer’s wiring diagram and manufacturer’s instructions. |
| Batteries not charging | Incorrect switch position or faulty switch | Verify the switch is in the correct position. If problem persists, replace the switch. | Check the charging system of your tow vehicle. |
Battery Switch and Power Management
A battery switch is more than just a simple on/off switch for your travel trailer’s batteries; it’s a crucial component in effectively managing your power resources and preventing costly damage. Understanding its role is key to maximizing your RV’s power efficiency and longevity.Your battery switch acts as the central control point for directing power flow between your house batteries and other power sources, such as shore power or a generator.
This control allows for selective charging and discharging, preventing unwanted drain and extending the lifespan of your batteries.
Battery Switch Roles in Preventing Battery Drain
The primary function of a battery switch is to isolate your house batteries from the rest of the trailer’s electrical system when not in use. This prevents parasitic drain, which occurs when small appliances or electronics draw a small but continuous current even when switched off. Over time, this seemingly insignificant drain can completely deplete your batteries, leaving you stranded.
By switching to the “off” position, you effectively cut off this drain, preserving your battery power for when you need it most. A properly functioning battery switch also ensures that you’re not accidentally draining your batteries while connected to shore power, allowing them to fully charge.
Power Management Benefits of Different Battery Switch Types
Several types of battery switches offer varying levels of power management capabilities. A simple single-pole, double-throw (SPDT) switch provides basic on/off control for one battery bank. More advanced switches, like multi-bank switches or those with built-in charging features, offer greater control and efficiency. For instance, a multi-bank switch allows you to switch between multiple battery banks, ideal for those with auxiliary batteries or solar panels.
Switches with integrated charging capabilities can optimize charging cycles, preventing overcharging and extending battery life. Finally, some advanced switches offer remote control and monitoring capabilities, providing convenient management from inside your RV.
Power Flow Through a Typical Battery Switch System
The following flowchart illustrates the typical power flow in a system with a single battery bank and a simple SPDT battery switch.
                                     +-----------------+
                                     | Shore Power/Gen |
                                     +--------+--------+
                                             |
                                             V
                                     +--------+--------+
                                     |    Charging   |
                                     |     System     |
                                     +--------+--------+
                                             |
                                             V
                                     +--------+--------+
                                     | Battery Switch |---(Off)--> Batteries (Isolated)
                                     +--------+--------+
                                             |
                                             V  (On)
                                     +--------+--------+
                                     |    House       |
                                     |  Appliances     |
                                     +--------+--------+
This illustrates how the battery switch acts as a gatekeeper, controlling the flow of electricity to and from the house batteries.
When the switch is “off,” the batteries are disconnected, preventing drain. When “on,” power flows from the batteries to the appliances, allowing you to use your RV’s electrical system. Note that this is a simplified diagram; more complex systems with multiple batteries and charging sources will have a more intricate flow.
Battery Switch Maintenance and Replacement
Keeping your travel trailer’s battery switch in good working order is crucial for reliable power. Regular maintenance prevents problems and extends the lifespan of the switch, saving you time and money in the long run. Neglecting maintenance can lead to corrosion, poor connections, and ultimately, switch failure.
Routine Battery Switch Maintenance Schedule
A proactive approach to maintenance is key. We recommend a visual inspection of your battery switch at least every three months, or before each extended trip. A more thorough cleaning and inspection should be performed annually, or more frequently in harsh environments (e.g., coastal areas with high salinity). This schedule ensures early detection of any issues, preventing them from escalating into major problems.
Cleaning and Inspecting Battery Switch Components
Before starting any cleaning, always disconnect the battery power to prevent accidental shocks. Use a wire brush or sandpaper to clean the terminals and connections, removing any corrosion or buildup. Pay close attention to the switch itself, checking for any signs of damage, loose connections, or excessive corrosion. A simple spray of electrical contact cleaner can help restore conductivity.
After cleaning, carefully inspect all components for any signs of wear or damage. If you notice any cracks, loose parts, or significant corrosion, replacement may be necessary.
Replacing a Faulty Battery Switch
Replacing a battery switch is a relatively straightforward task, but it requires careful attention to detail. Before starting, make absolutely sure the battery power is disconnected. This step is paramount to safety. The process generally involves removing the old switch from its mounting location, noting the wiring configuration carefully before disconnecting any wires, and installing the new switch in its place.
Ensure all connections are secure and properly tightened. After installation, reconnect the battery power and test the switch functionality.
Tools and Materials Needed for Battery Switch Replacement, Battery switch on travel trailer function
Proper tools make the job easier and safer. Here’s what you’ll need:
- Screwdrivers (Phillips and flathead, sizes appropriate for your switch)
- Wire brush or sandpaper
- Electrical contact cleaner
- New battery switch (choose one with the same amperage rating as the original)
- Wrench (if the switch is secured with nuts and bolts)
- Electrical tape or heat shrink tubing (for securing connections)
- Gloves (to protect your hands)
- Multimeter (optional, for testing switch functionality)
Safety Considerations with Battery Switches: Battery Switch On Travel Trailer Function
Working with RV batteries and their associated switches involves inherent risks. Improper handling can lead to serious injury or damage to your equipment. Understanding these risks and implementing appropriate safety measures is crucial for a safe and enjoyable RV experience. This section details the potential hazards and Artikels essential safety practices.
Improper use of a battery switch can result in several dangerous situations. Connecting batteries incorrectly can create short circuits, leading to sparks, heat generation, and potentially fires. Touching exposed terminals while the switch is engaged can result in severe electrical shocks, causing injury or even death. Furthermore, neglecting regular maintenance and inspection of the switch and battery connections can lead to corrosion, weakening of connections, and increased risk of failure.
Following the manufacturer’s instructions is paramount in mitigating these risks.
Potential Hazards Associated with Improper Battery Switch Use
Ignoring safety precautions when working with RV batteries and switches can lead to a range of hazards. A short circuit, caused by accidental contact between positive and negative terminals, can generate intense heat, potentially igniting nearby flammable materials. This could result in a fire, causing significant damage to your RV and posing a serious threat to your safety. Similarly, improper handling can lead to accidental contact with exposed terminals, resulting in a potentially fatal electrical shock.
Corrosion on battery terminals and switch connections can create resistance, leading to overheating and a potential fire hazard. Furthermore, neglecting regular inspection can lead to unnoticed damage, increasing the likelihood of failure and subsequent accidents.
Importance of Following Manufacturer’s Instructions
Manufacturer’s instructions provide crucial guidance on the safe operation and maintenance of your RV’s battery switch. These instructions Artikel the correct procedures for connecting and disconnecting batteries, troubleshooting issues, and performing routine maintenance. Ignoring these instructions can void warranties, increase the risk of accidents, and potentially lead to serious injury or damage. Always consult your specific battery switch’s manual for detailed instructions and safety warnings.
For example, some switches require specific disconnection sequences to prevent damage to sensitive electronic components in your RV. Deviation from these instructions could lead to malfunctions or damage to your RV’s electrical system.
Safety Measures to Prevent Electrical Shocks or Fires
Several safety measures can significantly reduce the risk of electrical shocks and fires when working with RV batteries and switches. Always disconnect the negative terminal first when working on the battery system to prevent accidental short circuits. Wear appropriate safety gear, including safety glasses and insulated gloves, to protect yourself from sparks, splashes of corrosive battery acid, and electrical shocks.
Use insulated tools to avoid accidental contact with live terminals. Regularly inspect battery terminals and switch connections for corrosion and tighten loose connections to maintain a secure and safe connection. Ensure proper ventilation around the batteries to prevent the buildup of flammable hydrogen gas, a byproduct of battery operation. Keep a fire extinguisher rated for electrical fires readily available in case of an emergency.
Safe Working Practices Around RV Batteries and Switches
A visual representation of safe working practices would show a person wearing safety glasses and insulated gloves, using insulated tools to work on the battery and switch. The person is clearly distanced from any flammable materials, and the area is well-ventilated. The negative terminal is clearly marked, and the disconnect sequence is depicted showing the negative terminal being disconnected first.
A fire extinguisher is visible in the background, and the overall scene conveys a sense of careful and methodical work. The illustration would also highlight the importance of consulting the manufacturer’s instructions before commencing any work. The battery terminals are shown clean and free of corrosion, and all connections are secure and properly tightened. The overall message is one of caution, preparedness, and adherence to safety procedures.
Mastering your travel trailer’s battery switch is a vital skill for any RVer. By understanding its function, performing regular maintenance, and knowing how to troubleshoot problems, you’ll ensure reliable power and avoid costly repairs. Remember, safety is paramount—always prioritize safe practices when working with batteries and electrical systems. Happy travels!
FAQ
What happens if my battery switch is faulty?
A faulty switch can lead to dead batteries, intermittent power, or even electrical fires. Symptoms include flickering lights, appliances not working, or an inability to charge your batteries.
How often should I inspect my battery switch?
Inspect your battery switch at least twice a year, or more frequently if you use your RV often. Look for corrosion, loose connections, and any signs of damage.
Can I replace a battery switch myself?
Yes, but basic electrical knowledge is recommended. If unsure, consult a professional RV technician.
How do I clean corrosion from my battery switch?
Use a wire brush and baking soda solution to carefully clean corrosion from the terminals and switch contacts. Always disconnect the batteries before cleaning.
